Wednesday, 15 August 2012

[TUT] How To Remove an OS from Windows Dual Boot Config(For Windows 7 & XP)

How To Remove an OS from Windows Dual Boot Config [Step-by-Step]

1. Boot into the NON Windows 7 OS (original OS before you installed Windows 7 as a dual-boot). For most people this would mean booting into your Vista install however I’m going to guess there might be a few who setup a Dual-Boot config with Windows 2008 also (me for instance).


2. Click Windows Start button and Type msconfig and Press Enter (or click it with mouse)


2. Click Boot Tab, Click the OS you want to keep and Click Set as default


3. Click Windows 7 OS and Click Delete. Click OK


What you just did was remove Windows 7 from the Windows Boot manager so now it will no longer show up when you boot the computer. Essentially, the computer is no longer a Dual-Boot System (2 Windows Versions installed).


The next steps is to just simply delete the Windows 7 .VHD file.

This image has been resized. Click this bar to view the full image. The original image is sized 793x586.


Try it at your own risk. This is safe just follow the instruction.


Windows XP:

Click Start > My Computer (Right Click) > Properties then eto po next step.


Wednesday, 25 July 2012

FIX: Windows 7 Start Black Wallpaper


Just Follow this steps:

  • Go to Run (PRESS Windows logo + R)
  • Type Regedit
  • the locate this:  HKCU/Control Panel\Desktop had a Value called 'Wallpaper'
  • Right Click Wallpaper and Click Modify
  • and Copy this '%windir%\web\wallpaper\windows\img0.jpg' (without quotes)

If not working try this software called RemoveWat
RemoveWat is a tool that use to Remove Watermarks like this picture below:


RemoveWAT 2.2.6


Just download it, run as admin and there you go.  Your system will reboot for the program to take effect. 

Friday, 29 June 2012

TUTORIAL: How to make Word 2007 always save in 2003 format

Not everyone has updated to the 2007 edition of Microsoft Office. So a problem arises as we send them a Word 2007 document without converting it into 2003 format. However, it is possible to make Word 2007 always save in 2003 format. By changing a few settings, we can make Word 2007 always save in 2003 format automatically. This can save our time as we won’t have to convert a document each time we have to send one. Follow these steps to make Word 2007 always save in 2003 format:

1. Open Word 2007.

2. Click on the Office button.

Image

4. The Word Options dialog box will appear.

5. Select the Save tab.

6. Select “Word 97-2003 Document” from the menu of “Save files in this format”. 

Image

7. Click on the OK button.

After this you will never have to worry about mistakenly sending the incorrect format of Microsoft Word 2007 to anyone. The same procedure can be used to change the settings of Microsoft Excel 2007.

TRICKS: 2 Useful USB drive tricks. USB Icon & Background image.

First of all, I've just found this trick in the Internet. Here we go!

A. How to change USB icon:

First you need to find a cool graphic that will be used to display the new icon of your USB drive. The graphic can either be an .ico or .bmp file. (you can download cool icons fromhttp://www.iconarchive.com/).

Once you have the new icon, create a text file on your Desktop (right click and select New \ Text Document) and name it: autorun.inf

NOTE: If the file autorun.inf exists on your USB drive, you do not need to create a new file or replace it if your current autorun.inf is a virus.

Next, open the file using notepad and copy the following text to the file (remember, if the file already exists, check to see if the following text is present),


[autorun]
icon=YourIconHere.ico


The file name for the icon parameter should be the name of your .ico or bmp file.
If you also want to change the name of the USB drive that is displayed, add the following text:

label=NewNameofDrive

Don't forget to change NewNameofDrive to what ever name you want the USB drive to be identified as.

Now copy both files (autorun.inf and .ico or .bmp) to the root of the USB drive. To view the new icons, safely remove the USB drive then plug it back in.

Now you can easily and quickly identify your USB drives…with out needing to remember their names!

Note: You can hide them by right clicking and then check the "Hidden" box. Do the same with the other file.


Preview:


B. How to add background image:

Step 1: Open notepad, and copy paste this:


[.ShellClassInfo]
IconFile=%SystemRoot%\system32\SHELL32.dll
IconIndex=127
ConfirmFileOp=0

[{BE098140-A513-11D0-A3A4-00C04FD706EC}]
Attributes=1
IconArea_Image="YourImageNameHere.jpg"
IconArea_Text="0x000000"
VeBRA sources - don't delete the tag above, it's there for XXXXX purposes -
[ExtShellFolderViews]
{BE098140-A513-11D0-A3A4-00C04FD706EC}={BE098140-A513-11D0-A3A4-00C04FD706EC}
{5984FFE0-28D4-11CF-AE66-08002B2E1262}={5984FFE0-28D4-11CF-AE66-08002B2E1262}

[{5984FFE0-28D4-11CF-AE66-08002B2E1262}]
PersistMoniker=Folder.htt
PersistMonikerPreview=%WebDir%\folder.bmp


After that, save it as "desktop.ini" (Do not include quotation mark).

Step 2: Place the file in your USB and same with your desired image.

Step 3: Replace this:
IconArea_Image="YourImageNameHere.jpg" <<< Name of your image file
IconArea_Text="0x000000" <<< Color of texts ( Texts of USB files, not the texts of image ) (To prevent the color of the image background same with the texts cuz it will be hard to read if same color)

Step 4: This is optional, this will hide the file in your USB. Right click on your text file, click properties. At the bottom part, put check on "hidden", do this the same with the image file.

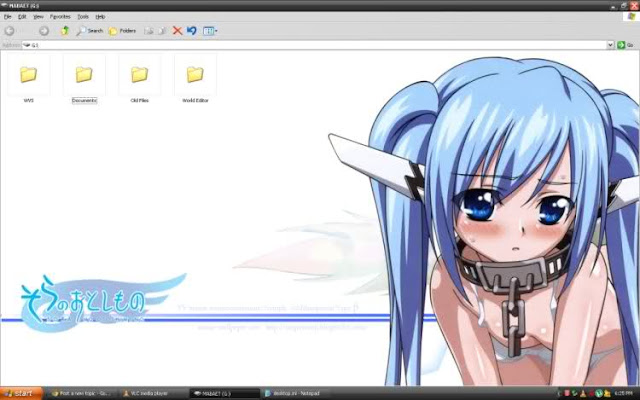
Step 5: Refresh! F5 or right click then refresh. You'll see the image appears!

Note: The 2 files ( desktop.ini, and image ) must not be inside any folder and must be inside the root of your USB drive, or else your USB will crash and will never be able to use it again (Corrupted)... just kidding, the trick will not work if the files are inside a folder.

Preview:


C. How to recover hidden files:

http://www.addictivetips.com/windows-tips/show-hidden-files-and-folders-in-usb-drive/

TUTORIAL: How to fix "NTLDR is Missing" for Win XP

I know its a common and easy problem for those who knew it already, but this post is for the others who wants solution for that error :)

1. Load Windows XP CD into CD drive.
2. Make sure BIOS is set to boot to CD drive.
3. Boot the computer from CD.
4. At menu, press "R" to load Recovery Console.
5. Select the installation to be fixed.
*The following instructions assume CD-ROM is labeled as drive D and the hard drive partition the windows installation is on is labeled as drive C. Replace the letters accordingly.
6. Type "COPY D:\i386\ntldr C:\" and press ENTER.
7. Type "COPY D:\i386\ntdetect.com C:\" and press ENTER.
8. Remove CD and type "EXIT" and press ENTER (to reboot your computer).

TUTORIAL: Repair a RAW Hard Disk FileSystem Error

You plug as usual your external hard drive to your computer to retrieve its contents or to add files when Windows offers to format it. Your hard drive has serious problems you'll have to try to solve in order to, most importantly, recover your files, and repair your hard drive to it again as usual.

* Immediately click the Cancel button.
* Right-click the Computer icon on the Start menu or desktop and click Manage.
* In the window of Computer Management, scroll down to Storage and click Disk Management.
* The list of drives connected to your computer appears. Among them, your hard disk is now reluctant. This means that it works and is recognized by the system.
* However, its file system is shown as RAW, is to say raw data unreadable by Windows.


Download and run TestDisk: Download Here

TestDisk is a free software that will allow you to help recover lost partitions and repair the partition table corrupt your hard drive. You can download TestDisk from here.

* Once the download is complete, click the Open button.
* Click Extract all files.
* In the wizard that opens, click the Extract button.
* Open the folder testdisk-****.
* Then open the folder win.
* Double click on the file so testdisk_win.exe.

Analyse your hard drive:

TestDisk can check the structure of the partition table of your hard drive to locate all partitions, even those who have disappeared.

* With the arrow keys, select Create and press the Enter key.
* Your hard drives are then detected and listed. With arrows, select the disk that you are unable to access and press Enter.
* Testdisk automatically detects the type of the partition table of your hard drive. Press Enter.
* Select the scan option and press the Enter key to verify the structure of the partition table.
* Press Enter.
* If the partitions have been created on Windows Vista, Windows 7 or if in doubt, press the Y button.
* The partitions found on the disk are displayed.
* Select Write to write the new partition table.
* Select the partition which has disappeared from Windows and press the p key. The list of folders and files on the disc is displayed.


Recover files:

With TestDisk, you can easily access the contents of a RAW partition even if it is not available under Windows. It is thus possible to recover all your files and put them in a safe place on another hard drive.

* To save a folder and all its contents to another hard disk, select it and press the c button.
* Select a folder on another drive and press the Y button. Note that the file .. you will get into the folder tree.
* Press the Y button.
* The selected folder and all its content is copied and placed in secure location on another disk drive. Copy the message thus indicates that the copy is complete.
* Repeat for other folders and files to backup and then press the Esc key or Q.
* If all the partitions appear to be much missing from the list, select Write to rewrite the partition table.
* Press the Y button to confirm.
* Then press Enter and restart your computer.

Recreate the boot sector:

The problem may be your server's boot partition is corrupted. TestDisk will allow you to repair it.

* Select Advanced and press Enter.
* Select the partition RAW, move the slider to boot and press Enter.
* Select Rebuild BS and press the Enter key.
* Confirm the restoration of the backup boot sector by pressing the Y button.
* At the end of the transaction, your boot sector is repaired. Select Quit and press Enter.
* Then restart your computer to verify that your score is no longer blocked in RAW.


Recreate the partition:

If, despite the previous manipulations, your hard disk is locked in RAW, the last solution is to delete the partition and recreate recalcitrant. Well, so be sure to get all the files you need by following the instructions of his step Recover files. Once you've backed up your files in a safe place, you can use the freeware GParted partitioning to recreate the partition.

At first, create a bootable CD GParted, following the explanations of our file, partitioning a hard drive with Windows XP (it works of course with all versions of Windows). You will need to download GParted Live , Burn the ISO of GParted Live on a CD and Booting the Live CD of GParted .

* In GParted, click the right mouse button on the recalcitrant partition and click Delete.
* The partition is removed. Then click the right mouse button on the unallocated space that appears at the site and click New.
* Scroll File System and select NTFS.
* Reduce if necessary the size of the partition (for leaving the unallocated space to create a second) and click the Add button.
* Then click the Apply button.
* All data on the partition will be deleted. You must be sure that I saved your important files with testdisk. Confirm the operation by clicking Apply.
* Finally, click on Close. The partition of your hard drive is no longer in RAW, is a virgin and is usable again.

For more detailed instruction, you can visit the site:
TestDisk Step By Step - CGSecurity

TRICKS: Hide any file behind JPEG image manually

Things that you will need for this trick:
1. Winrar installed on your system.
2. Little knowledge of command prompt.


Steps to Hide any File behind JPEG image Manually

1. Create an folder into C drive (recommendation is that use this C:\Hidden).

2. Now gather all files that you want to hide in this folder.

3. Now add these all files to compressed .rar file using winrar
(example myhiddenfiles.rar ).
Note: This rar file should be in the same directory (i.e. C:\Hidden)

4. Now Select the JPEG file that you want to use to hide the above content
(say myimage.jpg). Put this image file also in the same folder that is in C:\Hidden

5. Now, open Command Prompt (Go to Run and type ‘cmd‘). Make your working directory C:\hidden.
(When you open CMD you will get like C:\Documents and settings\username (something like this)
Now type cd.. and press enter and then again type cd.. and press enter. Now you have something like this in cmd C:\ . Now in front of that type cd "Hidden" and press enter. )

6. Now type: “COPY /b myimage.jpg + myhiddenfiles.rar outputimage.jpg” (without quotes) - Now, myimage.jpg is the picture you want to show, myhiddenfiles.rar is the file to be hidden, and outputimage.jpg is the file which contains both....

7. Now, after you have done this, you will see a file output.jpg in C:\hidden. Open it (double-click) and it will show the picture you wanted to show. Now try opening the same file with WinRAR, it will show the hidden archive...


Thats all!!!

Monday, 25 June 2012

Discovering Computers - Fundamentals 2011 Edition (Shelly Cashman) [Paperback]


Students are guided through the latest trends in computer concepts and technology in an exciting and easy-to-follow format. Updated for currency, this book and the robust Online Companion provide students with the most up-to-date information on the latest technology in today's digital world.


Download Link

Friday, 15 June 2012

DOCK on your taskbar!


                                                Introducing Dockbar 7

a Windows 7 Theme + icons and some other stuffs
it features the taskbar of Windows7 transformed into a DOCK!


YES! You are actually seeing a taskbar that looks like a dock. Believe it or NOT!


Download Link

Tuesday, 12 June 2012

Make "Portable" Version Of any Software

Now a days almost everybody carries a pendrive whether he is a IT professional or a home User. There are a lot of softwares that you want to carry with you so that you can open them anywhere without any installations. Here is the solution to create a portable version of any software. Moreover you can also create a package of software.

Consider you love using opera browser and addicted to its user interface. You can create the portable version of opera with java and flash already installed in the opera. So you are not creating a portable version of your favorite browser instead you are creating a portable executable package file that has opera with flash and java already installed in it.

You can create a portable package of your choice of softwares.

Here is the complete step by step tutorial to Make Portable Version Of any Software.


1. Download the Cameyo software. It's completely free. Download Here


2. Install the software.

3. Now Click on Start->Cameyo->Capture Software Installation

4. Install the software into your system whose portable version you want to create.

5. After Complete installation of the software click on the Install Done of the cameyo screen.

6. Now it will create a portable version of your installed software which you can carry and run anywhere without any installation.

Trick to Display Your Name With Time in Taskbar

You can display your name with time instead of AM/PM in taskbar of windows 7, vista and windows Xp without using any third party software.You can use two names and they will be automatically changed during daytime (AM) and Night (PM).


Trick to Display your Name with Time in Taskbar:

1 - Click on your time in the taskbar and then click on the Change Date and time Setting.


2 - It will open new a window, click on the Change Date and Time Setting.


3 - Now click on the Change Calendar Setting.
4 - In the customize Format window select Time Tab.
5 - In this tab look for AM/PM symbol and give any name that you want to display along with Time
6 - Click on OK button to save changes.

Lock Your Folder with Password Without Using Any Programs


Concederedly some people have many things to hide

So, do this simple steps without programs 100% WORKING by my test.


1- make a new folder ( name it as you like )

2- inside this folder make a ( TXT ) file & copy this:


cls
@ECHO OFF
title Folder Private
if EXIST "Control Panel.{21EC2020-3AEA-1069-A2DD-08002B30309D}" goto UNLOCK
if NOT EXIST Private goto MDLOCKER
:CONFIRM
echo Are you sure you want to lock the folder(Y/N)
set/p "cho=>"
if %cho%==Y goto LOCK
if %cho%==y goto LOCK
if %cho%==n goto END
if %cho%==N goto END
echo Invalid choice.
goto CONFIRM
:LOCK
ren Private "Control Panel.{21EC2020-3AEA-1069-A2DD-08002B30309D}"
attrib +h +s "Control Panel.{21EC2020-3AEA-1069-A2DD-08002B30309D}"
echo Folder locked
goto End
:UNLOCK
echo Enter password to unlock folder
set/p "pass=>"
if NOT %pass%== password here goto FAIL
attrib -h -s "Control Panel.{21EC2020-3AEA-1069-A2DD-08002B30309D}"
ren "Control Panel.{21EC2020-3AEA-1069-A2DD-08002B30309D}" Private
echo Folder Unlocked successfully
goto End
:FAIL
echo Invalid password
goto end
:MDLOCKER
md Private
echo Private created successfully
goto End
:End


3- after u copy the Commanding go to line ( 23 ) u will find this word : password here (Change it with ) any password u like.

4- After that make ‘save as’ & name as (locker.bat )

5- Now back to the folder & u will find a ( LOCKER ) commanding.

6- Click on it & u will find a new folder (Private )

7- Ok, now copy what u want in it & after that go to ( locker ) by click on it , it will open and ask you want lock your folder? Y/N ?

8- Type "y"

9- If you want to UNLOCK your folder, go to (locker) & type your pass and you will see your private folder.

That’s all…amazing isn't..... try it now....

Computer Shutdown After 15 Seconds Done


Computer Shutdown After 15 Seconds Solved

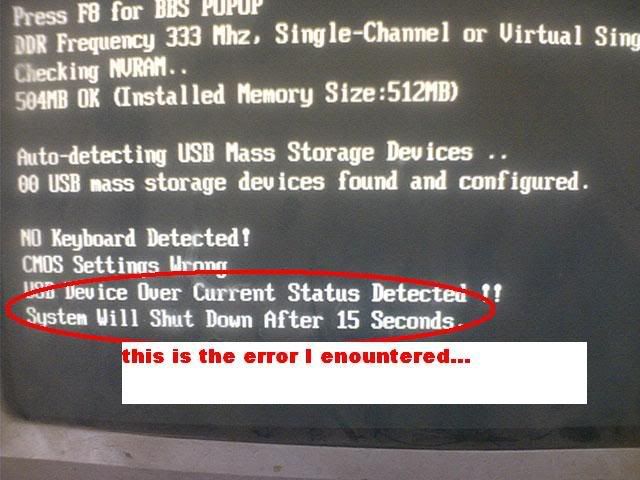
Problem: System Will Shutdown After 15 Seconds, see the pics below

Findings:
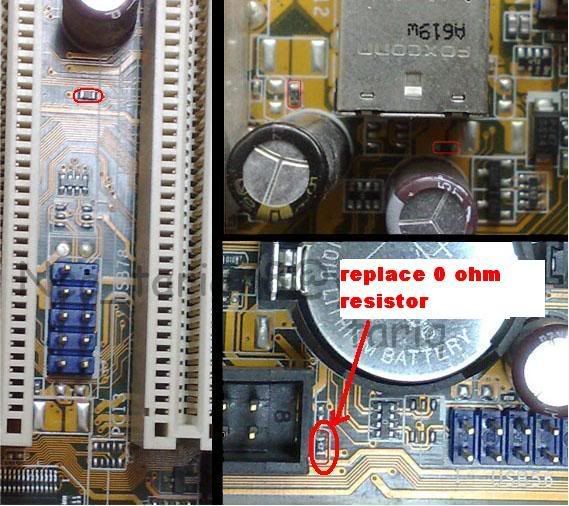
 Busted 0 ohm resistor

Action taken: 
Tried to enter in CMOS settings do, tried to reset the motherboard, still no luck ... tester all 0 ohm resistor USB hub .... see the pics by motherboard with a busted ..replace it ... Then Viola .... money .....


Tool's

> Tester
> Soldering Iron & lead
> O ohms resistor


Screenshots


How To Change Your Motherboard Battery

First the safety rules!


The inside of a computer is a bad place full of electricity and sharp edges.
On the electricity side always when working on you computer make sure that it’s still plugged in to the power socket and the power is turned off, this is to ensure that any static
From you is discharged through the earth. The inside of most computer cases are unfinished metal and has very sharp edges so be careful.


The first signs of a battery failing are:

Your clock starts running slowly
When you boot (start) your computer it has a problem finding your hardware (no hard drive, no cd rom)

To change the battery you need the following tools:

a X-point screwdriver
an anti-static strap(optional)
a new battery (seems logical)


Then unplug all the cables from the back of the computer as you remove them make a note where they came from. (So when you finished you can put them back).

Move the computer somewhere where you can work on it with ease
Remove the cover by locating the screws around the outer edge (back) of the computer
Some computer cases only require you to remove 2 screws on one side then a panel can be removed allowing you access to the computers insides, others you must remove 6 screws and remove the whole case by sliding it to the rear and lifting it off.


Now make sure that you read the safety instructions about static.
Look inside you will see a round silver thing that looks about the size of a 10p piece (quarter). This is the battery itself, carefully lift the retaining clip and slide the battery out. That’s it removed now go to your local computer retailer, electrical retailer (Tandy/Radio shack) taking the old battery with you and get a new battery.
Back to your computer insert the new battery by lifting the clip and sliding the battery in.

Reinstall your case and plug all the cables back (you did remember to label them didn’t you)
Turn on your PC. You will now need to go into you bios….
Right the bios is the god of your computer. To access it, when your computer first starts you will see a black screen with white text.
If you look carefully you will see a line that says something like "press del for setup" or some other key (F2 or ESC or tab) this will take you to god's house where you can make lots of changes to the way your machine works.


It is also the place where you can make your nice computer in to a rather expensive door stop so be careful and don’t go playing with anything.
You will now be presented with a blue screen with a lot of options on it, the one we want is Load Optimised / Default settings.
Press the F10 key for save setting and type Y, the computer should now reboot.
If every thing went well then your computer will now be up and running.


Extreme way (NOT RECOMMENDED):

Keep computer running.
Lay it on it's side and remove side cover to expose Motherboard.
Take any thin object, "small screwdriver, knife point, wood shiskabob skewer.
Pull back the battery retaining clip.
Toss the old battery in the junk receptacle, unless you belong to Greenpeace and want to save the earth.
Install the new battery. No need to reset bios becasue the compter supplies voltage to the CMOS while it is running.
Reset or resync clock with internet. Done!

Monday, 11 June 2012

Power ISO v5.1


New Features in v5.1:

1.Improve user interface "much better"

2.Support online upgrade

3.Improve Blu-ray disc burning

4.minor bug fixes and enhancements.
------------------------------------------
How to:      
1. Run exe 
2. click the install button
3. thats all, reboot w/ done!      

Download Link

Internet Download Manager v6.11 Build 8


What's new in version 6.11 build 8? (Released: Jun 07, 2012):


* Added support for Firefox 15


Description:

Internet Download Manager (IDM) has a smart download logic accelerator that
features intelligent dynamic file segmentation and safe multipart downloading
technology to accelerate your downloads. IDM increases download speeds by up to
5 times, resumes and schedules downloads. Comprehensive error recovery and resume
capability will restart broken or interrupted downloads due to lost connections,
network problems, computer shutdowns, or unexpected power outages. Simple graphic
user interface makes IDM user friendly and easy to use. IDM has a smart download
logic accelerator that features intelligent dynamic file segmentation and safe
multipart downloading technology to accelerate your downloads. Unlike other
download managers and accelerators, IDM segments downloaded files dynamically
during download process and reuses available connections without additional
connect and login stages to achieve best acceleration performance.

Main Features:

* Internet Download Manager supports all popular browsers including IE, AOL, MSN,
 Opera, Firefox, Avant Browser, and it can be integrated into any Internet
 application to take over downloads using unique Advanced Browser Integration
 feature.
* Dynamic Segmentation and Performance.
* Easy downloading with one click. When you click on a download link in a browser,
 IDM will take over the download and accelerate it. IDM supports HTTP, FTP, HTTPS
 and MMS protocols.
* Download Speed Acceleration. IDM can accelerate downloads by up to 5 times due
 to its intelligent dynamic file segmentation technology.
* Download Resume. IDM will resume unfinished download from the place where they
 left off.
* YouTube grabber. IDM can grab FLV videos from popular sites like YouTube,
 MySpaceTV, and Google Video.
* Drag and Drop. You may simply drag and drop links to IDM, and drag and drop
 downloaded files out of Internet Download Manager.
* Automatic Antivirus checking. Antivirus checking makes your downloads free
 from viruses and trojans.
* Advanced Browser Integration. When enabled, the feature can be used to catch
 any download from any application.
* Built-in Scheduler. IDM can connect to the Internet at a set time, download
 the files you want, disconnect, or shut down your computer when it's done.
* IDM includes web site spider and grabber. IDM downloads all required files
 that are specified with filters from web sites, for example all pictures from
 a web site, or subsets of web sites, or complete web sites for offline
 browsing. It's possible to schedule multiple grabber projects to run them once
 at a specified time, stop them at a specified time, or run periodically to
 synchronize changes.
* IDM supports many types of proxy servers. For example, IDM works with Microsoft
 ISA, and FTP proxy servers.
* IDM supports main authentication protocols: Basic, Negotiate, NTLM, and
 Keberos. Thus IDM can access many Internet and proxy servers using login name
 and password.
* Download All feature. IDM can add all downloads linked to the current page.
 It's easy to download multiple files with this feature.
* Download Categories. IDM can be used to organize downloads automatically using
 defined download categories.
* Download limits. Progressive downloading with quotas feature. The feature is
 useful for connections that use some kind of fair access policy (or FAP) like
 Direcway, Direct PC, Hughes, etc.
* IDM is multilingual.

*Install Notes*


1. Install Program. (Once installed, make sure to exit IDM)

2. Copy the patch to the install directory and apply it!
3. Enjoy!!!


Download Link